 MENU
MENU
CURRENT UTC
MENU

 YouTube
This flight simulator offers you the opportunity to practice fundamental IFR maneuvers, including tracking, interception, arc DME, holding, procedure turns, racetrack, and more. By utilizing this simulator, you can enhance your skills and situational awareness for the Instrument Rating, ultimately aiding in your overall improvement.
| START/STOP OFF |
| FAST FORWARD |
TAS 120 KT
ALTITUDE 2000 FT


HDG 360°
| -1° | -10° | +10° | +1° |
| -60° | +60° | ||
| INCREASE BANK | |||

0 KT
| WIND | |
| -90° | +90° |
DME
0.0 NM
360°
CRS 360°
| -1° | -10° | +10° | +1° |
| -60° | +60° |
TIMER: 00:00
| START/STOP |
| RESET |
AUTOPILOT
ALT 2000 FT
VS 0 FPM
| -100 FT | -500 FT | +500 FT | +100 FT |
| -10 FPM | -100 FPM | +100 FPM | +10 FPM |
| ATC: Intercept ... |
| ATC: Hold on ... |


 Smartphone? Tablet? Click here
 Are you unfamiliar with the IFR procedures ? I recommend watching these instructional videos:
By clicking on this link, you will discover further comprehensive information.
How to use this simulator ?
Click on the START/STOP button.
The airplane is controlled by an autopilot (AP). The AP is on heading and altitude mode.
The true airspeed is 120 knots except when climbing or descending below 2000 feet. In these two situations, the true airspeed is 100 knots.
You can change the heading if you click on one of the buttons below HDG. The airplane will turn at rate 1. It means that it will turn at 3 degrees per second and it will take 2 minutes to make a 360° turn. You can expedite the turn if you click on the INCREASE BANK button. This way, it will turn at rate 2 (6 degrees per second). By clicking one more time on the INCREASE BANK button, the airplane will turn at rate 1 again.
Initially, there is no wind, but you can add it by clicking on the WIND button. Each click will increase the wind speed by 10 knots. Once passed 30 knots, it will disappear. You have the option to select from four different wind directions (North, East, South and West).
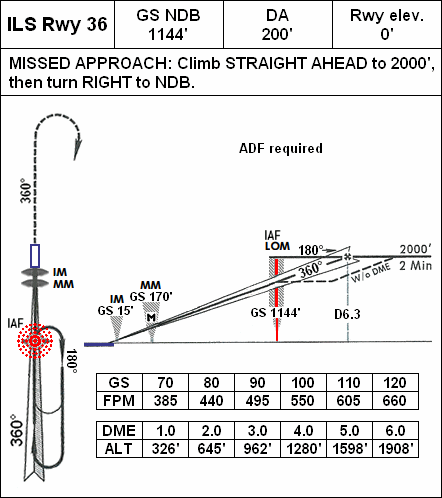
The DME (distance measuring equipment) indicates the distance between the VOR (or the ILS) ground station and the aircraft (slant range).
The AUTOPILOT can be set to an altitude to reach or to maintain. And you can modify the vertical speed (VS) by clicking on the different buttons.
By clicking on ILS, VOR, ADF, DME or MARKERS, you can select the radio aid you wish to use.
The blue one line needle indicates the direction towards the VOR or the ILS, depending what you have selected.
The blue double lines needle indicates the direction towards the ADF.
The bold green needle represents the radial (inbound or outbound) you want to intercept. If the VOR is selected, you can choose the course by clicking on one of the buttons below CRS.
If the ILS is selected, the small moving diamond indicates if you are flying too high or too low compared to the normal slope. The diamond shall be centered during the final approach phase.
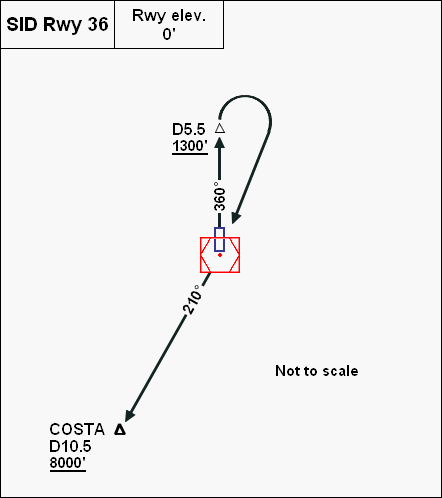
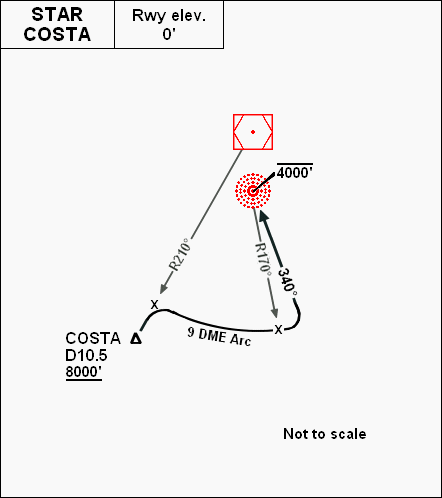
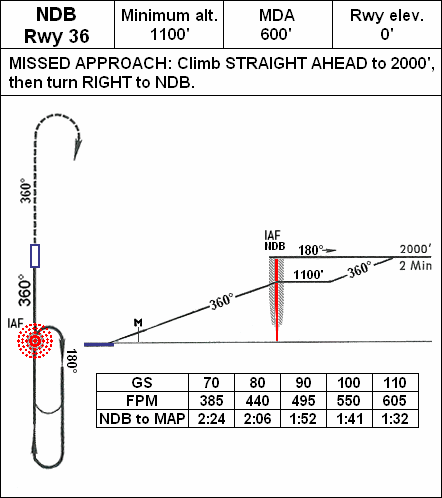
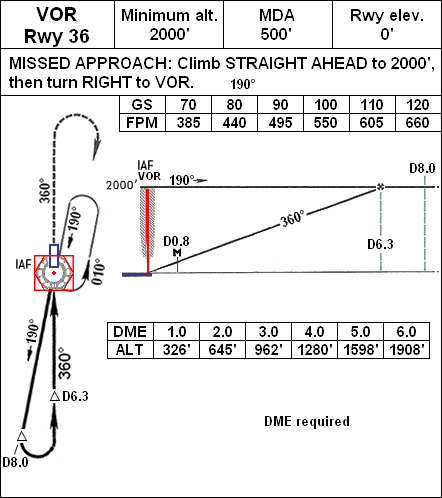
If selected, the three marker beacons warn you when passing over them. In this ILS approach, your altitude should be: 1150 feet when passing the outer marker, 170 feet when passing the middle marker and 15 feet when passing inner marker.
The timer is an aid you can use when you are making a holding, a procedure turn, etc.
You can start an exercise by clicking on one of the ATC buttons. The controller will ask you to either intercept or hold on a specified radial.
Finally, you can speed up the simulation by clicking on the FAST FORWARD button.
 PayPal.Me